Monday 16 December 2013

Christmas Awesomes


The weather in Saskatchewan has been brutally cold with numbers as low as -41 degrees in the last couple of weeks.  So, I am happy to report it only being -14 right now.  The weather network lied though as we were expecting -1, but hey sure beats -41.  

I am really hooked right now on this type of card.  So... just in case you missed the last group of Joy Fold cards... here is some more.  Doesn't that Stampin Up paper just get you all excited!!  This cute little House Mouse is actually from a clear stamp set. 


Monday 9 December 2013

MO Christmas Cards

Helllloooo people.  I am excited to show a few more cards today.  I have three cards and including one inside picture.  But first here's this years Christmas tree.  This year we did a new theme of blue and silvers.  It's sooooo pretty!!


But enough ooooing and ahhhhing at the tree and back to business we are here for.... CARDS!!

All of the cards below use the same Joy Fold type of technique which could be located here:  http://www.youtube.com/watch?v=8u_RnvolcZc

I hope you can see the gold reindeer well enough.  It's hard to get a good picture. 


In the spirit of my family's current theme of "use things up year" I added these little stocking embellishments.


This one is my favorite of the three.  I love most of Stampin up Paper, but I LURVE this one.  The velvet flourish ribbon HAS self adhesive, but doesn't work well so I did have to add more glue.  But I still love them.


Thanks for stopping in,
Nicole G

Monday 2 December 2013

Simply Elegant


Here is another card that I got to create in a Stampin Up group setting.  This is probably my favorite of all of them.  The traditional colors mixed with trees (one of my favorite things) AND glitter is a great mix in my opinion. 

All the product is from Stampin up, including the music designer paper.  The glitter is dazzling dust and so easy to use. 


Cute Card Thursday: Anything Goes

Thanks for Stopping in!!

Nicole G

Thursday 28 November 2013

More Christmas Cards


Here are some more cards from the workshops I recently did.  These are more simple, but perfect mass production or for those people who may need the most fanciest of your handiwork.  Let's face it, not everyone understands handmade cards.  

I love the color scheme for these cards.  All of this product was via Stampin UP.  This is basically just layering, adding some snowflakes, bling and sentiments.  


It's hard to tell here, but the white paper below has a shimmer to it (and is really quite pretty).


Thursday 21 November 2013

Elegant Pointcettia Christmas Card


Here is another card from the workshops I did a couple of weeks ago.  This is one of my favorites and not too complicated so it's easy to duplicate for many xmas cards. 

All products are by Stampin up including the very pretty snowflaky bling in the center of the poinsettia. 

You stamp an image on velum with versa mark, pick your embossing powder color, cut it out and voila, dimensional poinsettia!! 


Thursday 14 November 2013

Santa Baby


Hellllloooo everyone.  Recently I joined a card class to get a jump on my xmas cards.  I'll be showcasing them in the next few weeks.  All the product shown is by Stampin Up.  We tried it with a couple of different ribbons for different looks. 


I really like the old vintage color scheme we used on this one.  And who doesn't love dazzling diamonds! 


2 Sister's Challenge Blog: sparkle


Hope you have enjoyed today's card!

Nicole G

Friday 1 November 2013

First Christmas Card!


I think, like many card makers, that I got into this hobby thinking I could SAVE money by making my own Christmas cards.  Well... that's wrong, mostly cause we crafters want more and more stamps and more and more product!!!  Before you know,  you have an entire room dedicated to making cards.  At least that's what I did.  :)

Tri-fold cards are uber fun with all the space and nooks and crannies they have.

The two copic colored images are BirgittaSanta from CC Designs and the other is Jana (Instyle Stamps).  I used a snowflake punch and the other unique punch both from Martha Stewart.  The snowflakes and bling are from my very old stash of winter goodies.


Here's the tutorial
http://www.splitcoaststampers.com/resources/tutorials/trishuttercard/

Hope you've liked today's card,

Nicole G

Thursday 31 October 2013

Happy Halloween Everybody!!


Well... today is the day.  The day to finally hand out the candy I have been purchasing (and eating). Luckily, there is still enough for the kids!! 

The images from Kenny K are always so inspiring and sometimes a little provocative.  Which is why there are so fun to color!! 


I wish everyone a fun and safe Hallow's Eve!

Nicole G.

Thursday 17 October 2013

Fall Card


Good morning peeps.   Today's card is a version of the Joy Fold Card.  I just LOVE new and inventive ways for card folds.  They always add texture to what could be a boring card.  Well, being that's it's full out fall, I figured this card was perfect.  The image is from All that Scraps and is called Pumpkin Emma. I colored Emma with my copics.


Check out this tutorial on how to create this fun card http://www.splitcoaststampers.com/resources/tutorials/joy_fold_card/


Thanks for stopping by, 

Nicole G 

Saturday 12 October 2013

Halloween cards


Here are some of this years Halloween cards.  Even though I do not have kids and no reason to create Halloween cards, they are some of my favorite.  You can often play with colors you might not normally get to.  


Thanks for stomping by,

Nicole G

Saturday 5 October 2013

Black Magic

It's hard to believe that it is fall already, however after seeing the temperature which was -3 C this morning you know that summer is gone. Luckily, fall is my favorite season.  There is a special place I like to visit (Fort' Qu'appelle, Saskatchewan)  in the fall because it's so beautiful.


Now to cards, I've always been a big fan of trying new things with all my crafting supplies and this was another one of those cards.  I'd seen the technique for Black Magic and had to give it a try.

The stamp is from Stampendous and is called Peacock Points. It was a Michael's purchase from a long time ago and had not seen any action yet!


Here is the video of where I learnt it from with basic instructions from Splitcoast Stampers below.


Supplies
  • Black cardstock, or another dark colored cardstock
  • White pigment ink
  • Colored pencils
  • White gel pen
  • Heat embossing tool

Step-by-Step

  1. Step 1

    Stamp solid image in white craft ink onto black cardstock.
    Hint:
    Other dark cardstock will work as well.
  2. Step 2

    Heat-set image with heat embossing tool.
  3. Step 3

    Color image with colored pencils.
    Keep the lighter colors toward the edges of the image for a more dramatic effect. Start with the darker colors at the base or center of the image and work your way to the outside edge and lighter colors.
  4. Your finished image should look something like this. Don't be afraid to press too hard when coloring with the pencils. The richer the color, the greater the contrast.
  5. Step 4

    Using a white gel pen, accent image with dots, and lines.
  6. Step 5

    Add image to card and embellish as desired.

    Hope you have enjoyed today's card
    Nicole G 


Tuesday 3 September 2013

Lovely day for a wedding

Wow... where has the time gone? Summer is already over and it's been about 6 weeks since I last posted. So I am very sorry for that, but look what I got in store for you today!

It was my brother-in-law's wedding a couple of weeks ago and so I decided I had to make a new and special card for them.  I'd love to take credit and say I came up with this alllllll on my own, however, and thankfully, there is Pinterest.  I am very lucky cause I roped in my husband to help me out with the drawing of the lines on this card, but this was super fun to make and now I am going to make a bunch of these for upcoming weddings.  This is a 6x6 inch card.  I forgot that I didn't ACTUALLY buy the envelopes for this size card months ago so I had to find a good tutorial on Youtube to help me out.

 http://www.youtube.com/watch?v=xbbBPeNb0gk&list=PL9u_rtkCnK6md75Sg4d4dj4AvBK9zCrFu

 But guess who ordered herself some envelopes immediately after?


I took the pictures before we put what we wanted to say on the left side of the card.  It naturally had a whole slew of sweet things to say to the bride and groom which I didn't need posted. Therefore, it looks a little blank at the moment.


And in case there are any other super nerdy girls out there like me, check this out on Kickstarter
http://www.kickstarter.com/projects/naileditec/espionage-cosmetics-nailed-it/posts/567578)

I should mention that the wedding was lovely. The bride and groom looked radiant and happy. It was also nice to catch up with family from near and far.

Anywho... it's been nice catching up with you all and will try to get back to you next week!

Nicole G

Sunday 14 July 2013

Gorgeous Girls Card

I used Copics to color this gorgeous girl.  I love Sugar Nellies Gorgeous Girls.  They are just sooo darn sweet and innocent! So fun to color. The fun resin flowers I received through ebay and they came in all sorts of colors.  I have left open a space for a sentiment so I have an easy and quick card at the ready...


Hope you have enjoyed today's card!

Nicole G

Friday 21 June 2013

My Really lovely House scrap page


I made this a while back.  I LOVE this scrap page.  This is the page that actually made me realized I could do scrap pages.  I had always found it very difficult to make them but this page came so naturally and I love it.


Talking about homes, I just want to send out hugs and comforting thoughts to those in Calgary dealing with the flooding.  Check out this video for the unbelievable fury of all that water.  https://www.facebook.com/photo.php?v=10152915137815526   I have checked with our friends and family and they are in safe places.

It is times as these that really make you appreciate your own current circumstances, my home, and my family.

Hugs to everyone today,

Nicole G

Thursday 20 June 2013

Recipe Challenge

Here is my GD Card for this weeks Recipe Challenge at http://trimmiescraftchallenge.blogspot.ca/


I wanted to make up a special card for my co-worker.  She is an absolute sweet heart so I wanted something really pretty and girly.  I certainly hope that this will fit the bill and that she loves it.   The image is actually from http://www.stampingbella.com/index.php?cPath=345.  My good card friend sent me this for Christmas.  Thanks Marilyn, I LOVE her! You can see her beautiful work on her blog here.

Bella is colored with copics and added a little bit of sparkle here and there.  I added blue bling and a pearl from my stash. The beautiful ribbon is from Stampin Up. I used one of my favorite new Spellbinder's Gold Elements die.


Hope you have enjoyed today's card and hope you will head over to  http://trimmiescraftchallenge.blogspot.ca/ and try to win some of the excellent images from the sponsors! 

Nicole G

Thursday 13 June 2013

Christmas Card Challenge

Today's Challenge at http://trimmiescraftchallenge.blogspot.ca/ is Christmas Card in June.  I love these super cute images from Bugaboo .  This one is called Ava and Deacon Merry Christmas Sign.  Bugaboo is offering  7 digis of choice from their site for winner number one!! 

In this card I used Copics to color the images.  I used LOTS of clear applique cause I used it on all the letters and the red on the candy cane.  I used my fun snow pen for snow! First time I've used it, LOVE it.   The awesome ornament border is a Memory Box die cut which I naturally blinged up! I also blinged up the Christmas tree and the bells.  The santa hats were flocked with white flocking.


Isn't this just awesome!  I just my smallest circle nestabilities to create backgrounds on the circle ornaments.


I hope you will join us at http://trimmiescraftchallenge.blogspot.ca/  this week!

Nicole G

Thursday 6 June 2013

C.R.A.F.T. Challenge Blog GDT numero uno!

I have joined C.R.A.F.T. Challenge as a GDT for June!  You can check them out here! 


Today is the first challenge and it is for Anything but a card.  This worked out perfectly cause I'd be dying to play around with the letter "N" I picked up from Michaels'.  I really love how it turned out.  So much so I am planning on buying the rest of the letters of my name and doing more!

To do this piece I added additional inks to the wood.  Then I embossed SU's Script Stamp with versa mark.  I think the purple shows really well, but unfortunately, the green doesn't show through as much. I used a Martha Stewart punch for the inside of the letter in purple and added some strange and fun bling to line it up.  I added chipboard leaves but used crackle paint and then further embossed them for more crackle effect.  As green is my favorite color, I added my favorite green ribbon.  I have a lineup of studs on the right side of the letter.  In the second picture you can see my very favorite image, fleur-de-lis!


I hope you have liked this weeks creation and hope even more that you will join  C.R.A.F.T. Challenge this week too! 

Nicole G

Monday 27 May 2013

Inspiration Rhianna


I made this card for a friend of mine.  She kept singing the song S&M by Rhianna for a week and I knew this image would be PERFECT for it.

I learned this type of card fold in a SU class. It's called a Joy Fold Card.

The embossing folder is hearts and skulls by Cuttlebug.  All the paper is from SU'

Here is the tutorial: http://www.splitcoaststampers.com/resources/tutorials/joy_fold_card/


Hope you have enjoyed todays whipping good card.  LOL.


Nicole G

Tuesday 21 May 2013

Birthday Goth Girl


I really love coloring little goth girls.  I feel like you can do just about any ole think you can think of with them.  This cutie is called pinkie and can be found here: http://www.tiddlyinks.com/search.php?search_query=pinky&x=-988&y=-87   

I colored her with copics.  Just love coloring fun and crazy hair colors! The paper is SU Halloween paper.  The embossing folder is from Cuttlebug and is called Skull and Crossbones .  http://www.ebay.ca/itm/NEW-CUTTLEBUG-SCRAPBOOKING-EMBOSSING-FOLDER-ROCK-PRINCESS-SKULL-SHOES-HEARTS-/230919387576?pt=US_Die_Cutting_Machines_Dies&hash=item35c3de39b8&_uhb=1

I did some distressing along the edges and added some shiny rhinestones along my beaded circle Spellbinders diecut. 


Here is a preview of an image I have just completed.  Hopefully I'll get a card done up with her soon and post.


Thanks for visiting on this lovely day, 

Nicole G! 


Wednesday 15 May 2013

Nathan, we meet at last.

So, do you have a favorite actor?  A celebrity role model?  I do and my husband has been wonderfully supportive of my undying appreciation for Nathan Fillion for many years now (the second man in my life, LOL) He is not just a little supportive you see... he found out that Nathan was going to be in Calgary for the Calgary Comic and Entertainment Expo  and suggested IF I wanted to, we could go Calgary for the trip! IF I wanted too, Bwah!


This trip was so exciting for so many reasons.  I got to see people dress up as their favorite people.  See... here is Captain America! How awesome is it to just see people walking around all costumed up for the hell of it? Walking around downtown Calgary, at the Expo, on the C-train.  They were everywhere!


And here is IRON MAN! Seriously this guy was incredible.  He made this costume his own self! Anyone who knows me, knows I love Iron Man so this was freakin awesome!


Here is Robert Patrick.   I have known Patrick since X-files, Terminator but my favorite show with him was the Unit.  Check it out, it's on Netflix and is AWESOME!   I got to watch the X-Files panel with Mitch Pileggi, Gillian Anderson and Robert Patrick.  It was a 45 minute session on X-files.  It was amazing to be in the same room with anyone of these people, let alone THREE!


Well done up cars!


I also got to meet the incredibly talented Peter Dinklage! Her is working on my absolutely favorite current tv show, Game of Thrones!  The second panel was for Game of Thrones.  Seriously, I loved it. Lena Headly and Peter Dinklage were AMAZING!  The whole audience just hung on every word he said.


Other actors in attendance were Carrie Fisher, Wil Wheaton, Eliza Dushku, Richard Dean Anderson, Stan Lee, Linda frickin Hamilton!, and also nearly half the cast of The Walking Dead! and so so so many others.

But, you've been waiting patiently for the most important picture haven't you? So here it is!

And in case you don't recognize Nathan,(which seems absolutely crazy to me) he is the actor who plays Castle on tv check him out here  http://www.imdb.com/name/nm0277213/?ref_=sr_1

Here is Nathan and I! Yes, that's right... he is touching my shoulder!!!! Me screaming like a 16 year-old girl! Isn't he dreamy? He's also funny!


Here is my slightly nerdified Soul!


Hope you enjoyed today's cardless post as much as I did!

Nicole G

Sunday 12 May 2013

Mother's Day and My BIRTHDAY!

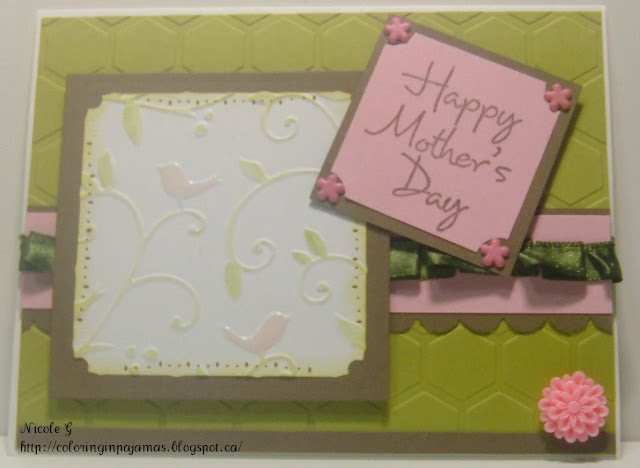
Today's post has a couple of cards that I made for mother's day.  The first two are similar with just a few changes to play around with the looks of the cards.  I really like the color combination.  Who knew this crazy green, pink and brown go together?


 I used many dies to create this card.  I also used Make-the-Cut with my cutter to create that interesting background piece.   After doing these cards I realized that I only have one stamp for Happy Mother's Day so you know what that means? Shopping!!!


And now for more and exciting news!

Today is my birthday! My husband is well aware of my Lego obsession, especially minifig obsession so this was for my birthday!  He got me a brand new creator series which I LOVE and now I have a cool hospital to build too.


The pictures don't do the faces justice, but this is my favorite so I had to add him.  It's that the best face!  Makes me laugh every time!


Aren't these minfigs like the cutest EVER? They are from the minifig series 10 group.  I am just trying to get the Decorator and the Librarian to finish the ones I want from this series. http://minifigures.lego.com/en-us/default.aspx?icmp=COUSFR23Minifigures

I got these creator series a couple of weeks ago in Calgary.  They were meant for me to make later in the month when I have time off, but I couldn't help build them as soon as we got home.  I added a few extra minifigs from my collection.  Now it's like a party house!


This was the second creator house I built.  Isn't this soooo darn CUTE!


I will update you guys on my progress with my new creator series and my hospital as I make them.


Hope you have enjoyed this fun post!

Nicole G